Introducing RINA
RINA (Recursive InterNetwork
Architecture) is the re-imagining of the current structure that underlies the
Internet as we know it. This structure is based on layers of separate, bespoke protocols
(OSI Model). RINA aims to
replace all of these layers with a single, unified protocol that is recursively layered
in order to provide the same functionality. The additional
benefits of this is approach are availability of features that the current design does
not natively support (for example multihoming), while
at the same time addressing many of the longstanding shortcoming
such as high routing complexity and suboptimal congestion control.
The Pristine Project
Nexedi is a member of the Pristine project alongside large industrial partners such as
Telefonica, Ericsson or Thales (full list of consortium partners).
Pristine was initialized in 2013 and aims to develop
a software development kit for the IRATI
RINA Linux OS prototype, research sophisticated policies for DIF layers, develop a DIF management system and apply
its findings to commercially exploitable solutions.
Nexedi's Role in Pristine
Our role in this project consists of making mesh networks scale in distributed
clouds, implement fairer routing and adding RINA support to SlapOS. Within this
scope one of the tasks we are currently working on is the implementation of the BABEL protocol (RFC6126) into
RINA. BABEL is a robust vector-distance protocol, that calculates routes with
much less message overhead than conventional protocols in use (like OSPF).
It also does so while being aware of network metrics such as latency and packet loss,
which current protocols ignore aswell. General obstacles for achieving this port include
non-existent support for RINA in normal "computer setups" and the incompleteness
of documentation and features of RINA by nature of its work-in-progress status.
RINA in the Cloud
As Nexedi is a company commited to cloud-based development and operation, integrating
a protocol into SlapOS, which is currently more geared for traditional networks
makes this whole port much more challenging and interesting. To get our feet on
the ground, our first step was the automation of creating "RINA Ready" systems
for development on SlapOS
using Ansible. In addition, we wanted to implement a network setup
that allows to run RINA in SlapOS along the way providing samples and utilities
to help non active RINA developers to be able to understand and leverage RINA
in their own applications.
Tutorial: Creating a small IRATI RINA Testing Environment in SlapOS
To get started we have created a small walkthrough showing how to setup RINA on SlapOS.
Step 1: Installing RINA Kernel
-
Start out with your desired number of KVMs in SlapOS (Tutorial: Request a KVM on SlapOS).
Install a fresh Debian/Ubuntu on each KVM. Switch to root and install ansible and tinc
using:
su
apt-get update && apt-get install ansible tinc
-
Next, download the latest ansible install script into the current directory using wget:
wget https://lab.nexedi.cn/AaronChen/RINA-Quick/blob/master/rina.yml
-
Run ansible with the newly downloaded script. This will begin the process
of compiling the rina kernel and associated tools. It will take a couple of
hours, so see you in a bit.
ansible-playbook -i "localhost," -c local rina.yml
-
When the ansible script is finished, the new kernel will be compiled but will
not be set as the default boot kernel. We are using the grub bootloader on a fresh
default Debian install. So this can be done by editing the grub config file located at:
/etc/default/grub
and changing:
/etc/default/grub
to:
GRUB_DEFAULT="1>2"
-
Save the file and then run update-grub to put the change into effect:
update-grub
-
Reboot the system and check if the correct kernel is loaded by attempting to
load a rina module:
modprobe normal-ipcp
If this completes without any warnings, the rina kernel is now being used.
-
Repeat this RINA kernel installation procedure on all your VMs.
Step 2: Setup tinc VPN
Now that the RINA kernel is installed, the next step is setting up the tinc
VPN. The tinc VPN requires a node that is not behind a NAT or can be port
forwarded to (655 by default). This node operates as a gateway into the VPN
and is required. Standard SlapOS VMs do not satisfy this requirement at this point.
Possible alternatives are a non-standard SlapOS VMs with the proper ports forwarded,
bare metal SlapOS, or a third party VM.
-
On each node (including the "server"), create a tinc configuration folder:
mkdir -p /etc/tinc/"NETWORK NAME"/hosts
and configuration file:
/etc/tinc/"NETWORK NAME"/tinc.conf
with the contents:
a. For the "server" nodes:
  Name = "SERVER NAME"
  AddressFamily = ipv4
  Interface = tap0
  DeviceType = tap
  Mode = switch

b. For the "client" nodes:
  Name = "UNIQUE CLIENT NAME"
  AddressFamily = ipv4
  Interface = tap0
  DeviceType = tap
  Mode = switch
  ConnectTo = "SERVER NAME"
-
Create host file on the "server" node:
/etc/tinc/"NETWORK NAME"/hosts/"SERVER NAME"
with the contents
Address = "EXTERNAL SERVER ADDRESS"
-
Generate key pairs for each node:
tincd -n "NETWORK NAME" -K
and accept the default save locations.
-
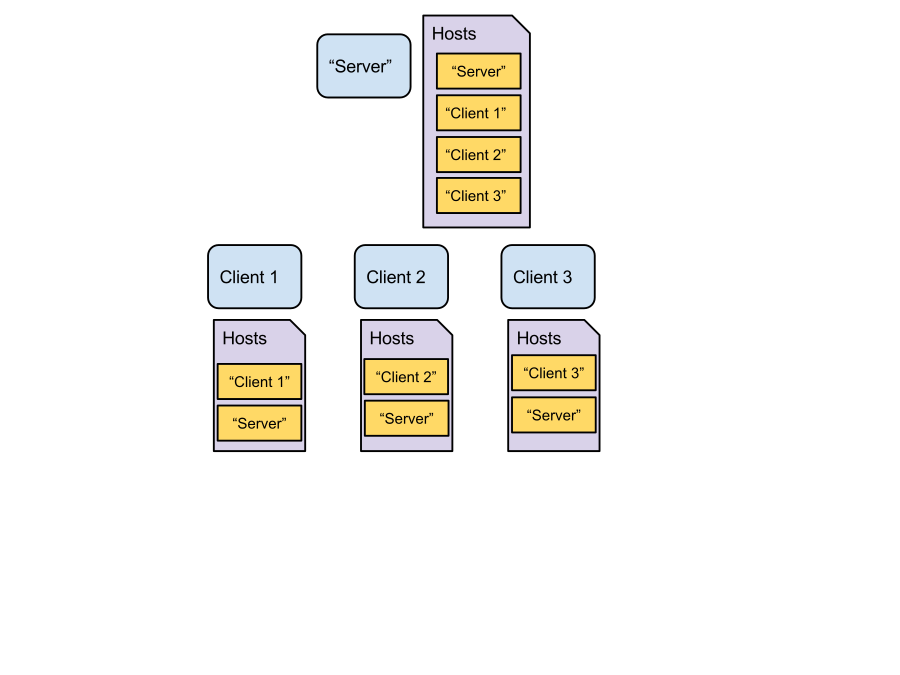
Each VM will now have a file in the hosts folder named after its unique
name. This file should contain each nodes public key. Distribute the server
host file into the hosts folder of every node and then put the host file
for every node into the server’s host folder:
server's host folder
  /etc/tinc/"NETWORK NAME"/hosts
    ->"SERVER NAME"
    ->"CLIENT1"
    ->"CLIENT2"
    ->"CLIENT3"

client 1's host folder
  /etc/tinc/"NETWORK NAME"/hosts
    ->"SERVER NAME"
    ->"CLIENT1"

client 2's host folder
  /etc/tinc/"NETWORK NAME"/hosts
    ->"SERVER NAME"
    ->"CLIENT2"

etc..
-
Create the interface files at each VM:
/etc/tinc/"NETWORK NAME"/tinc-down
with the contents:
ifconfig $INTERFACE down
and
/etc/tinc/"NETWORK NAME"/tinc-up
with the contents:
ifconfig $INTERFACE up
Finally, make them exectuable:
chmod 733 tinc-*
-
Set the network to start on boot. Inside:
/etc/tinc/nets.boot
add the line:
"NETWORK NAME"
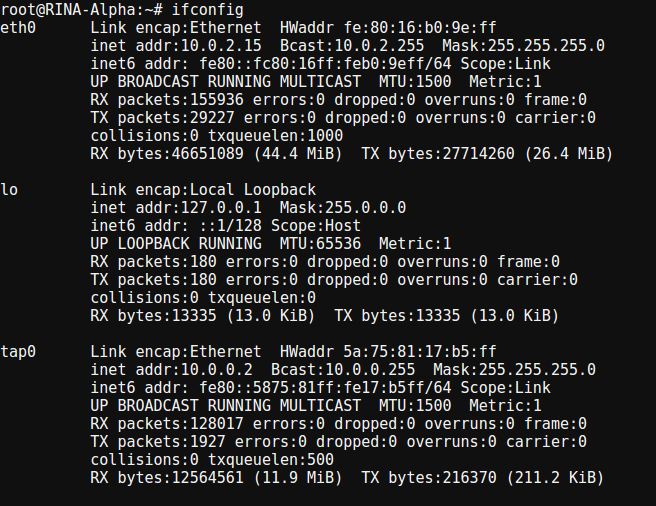
Restart the VMs, the tinc daemon will start on boot, running ifconfig
should show the tap0 interface. Tinc is now sucessfully installed.
Setup RINA
-
In every VM, create the necessary startup shell scripts to load the kernel modules and VLAN interfaces.
module load script:
modprobe shim-eth-vlan
modprobe rina-default-plugin
modprobe normal-ipcp
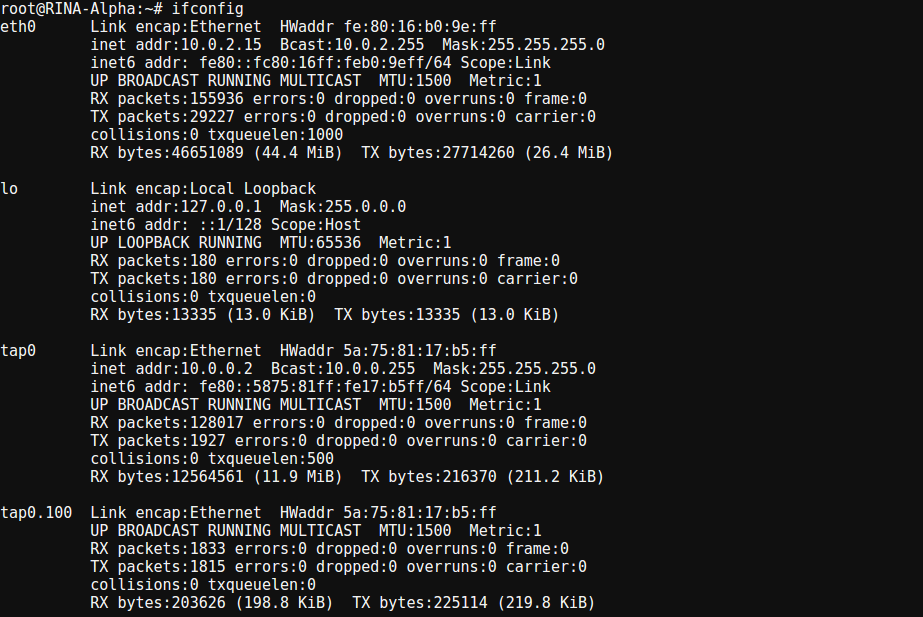
interface vlan script
Client 1:
ip link add link tap0 name tap0.100 type vlan id 100
ip link set dev tap0 up
ip link set dev tap0.100 up
Client 2:
ip link add link tap0 name tap0.100 type vlan id 100
ip link add link tap0 name tap0.101 type vlan id 101
ip link set dev tap0 up
ip link set dev tap0.100 up
ip link set dev tap0.101 up
Client 3:
ip link add link tap0 name tap0.101 type vlan id 101
ip link set dev tap0 up
ip link set dev tap0.101 up
-
Edit the ipcm config file (sample config files can be found at here). A more detailed
explanation of the settings can be found on the IRATI repository.
/etc/ipcmanager.conf
Client 1 (Default settings should be correct):

ipcProcessToCreate section:

  "ipcProcessesToCreate": [{
    "type": "shim-eth-vlan",
    "apName": "test-eth-vlan",
    "apInstance": "1",
    "difName": "100"
  }, {
    "type": "normal-ipc",
    "apName": "test1.IRATI",
    "apInstance": "1",
    "difName": "normal.DIF",
    "difsToRegisterAt": ["100"]
  }],

difConfigurations section:

  "difConfigurations" : [{
    "difName": "100",
    "difType": "shim-eth-vlan",
    "configParameters": {
      "interface-name": "tap0"
    }
  ...

knownIPCProcessAddresses section:

  "knownIPCProcessAddresses" : [{
   "apName": "test1.IRATI",
   "apInstance": "1",
   "address": 16
  }, {
   "apName": "test2.IRATI",
   "apInstance": "1",
   "address": 17
  }],


Client 2:

ipcProcessToCreate section:

  "ipcProcessesToCreate": [{
    "type": "shim-eth-vlan",
    "apName": "test-eth-vlan",
    "apInstance": "1",
    "difName": "100"
   }, {
    "type": "shim-eth-vlan",
    "apName": "test-eth-vlan2",
    "apInstance": "1",
    "difName": "101"
   }, {
    "type": "normal-ipc",
    "apName": "test2.IRATI",
    "apInstance": "1",
    "difName": "normal.DIF",
    "difsToRegisterAt": ["100", "101"]
   }],

difConfigurations section:

  "difConfigurations" : [{
    "difName": "100",
    "difType": "shim-eth-vlan",
    "configParameters": {
      "interface-name": "tap0"
    }
  }, {
    "difName": "101",
    "difType": "shim-eth-vlan",
    "configParameters": {
      "interface-name" : "tap0"
    }
  }

knownIPCProcessAddresses section:

  "knownIPCProcessAddresses" : [{
   "apName": "test1.IRATI",
   "apInstance": "1",
   "address": 16
  }, {
   "apName": "test2.IRATI",
   "apInstance": "1",
   "address": 17
  },{
   "apName": "test3.IRATI",
   "apInstance": "1",
   "address": 18
  }],

Client 3 (Default settings should be correct):

ipcProcessToCreate section:

  "ipcProcessesToCreate" : [{
    "type": "shim-eth-vlan",
    "apName": "test-eth-vlan",
    "apInstance": "1",
    "difName": "101"
   }, {
    "type": "normal-ipc",
    "apName": "test3.IRATI",
    "apInstance": "1",
    "difName": "normal.DIF",
    "difsToRegisterAt": ["101"]
   }],

difConfigurations section:

  "difConfigurations" : [{
    "difName": "101",
    "difType": "shim-eth-vlan",
    "configParameters": {
      "interface-name": "tap0"
  }
...


knownIPCProcessAddresses section:

  "knownIPCProcessAddresses" : [{
    "apName": "test2.IRATI",
    "apInstance": "1",
    "address": 17
  }, {
    "apName": "test3.IRATI",
     "apInstance": "1",
     "address": 18
  }],
-
On each VM, load the IPCM (IPC Manager) with the config file using:
run both the module and interface startup script

ipcm -c /etc/ipcmanager.conf
-
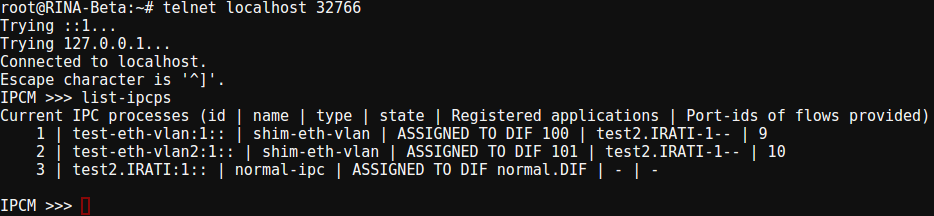
Connect to the ipcm manger using the command:
telnet localhost 32766
To check if the ipcm is properly configured, use the command:
list-ipcps
It should return something like this:
Current IPC processes (id | name | type | state | Registered applications | Port-ids of flows provided)
    1 | test-eth-vlan:1:: | shim-eth-vlan | ASSIGNED TO DIF 100 | test1.IRATI-1-- | 4
    2 | test1.IRATI:1:: | normal-ipc | ASSIGNED TO DIF normal.DIF | - | -
-
Enroll the VM’s in the ipcm console using the command:
client 1:
enroll-to-dif 2 normal.DIF 100 test2.IRATI 1

client 3:
enroll-to-dif 2 normal.DIF 101 test2.IRATI 1
-
The RINA enviroment is now setup. Using the comands:
client 1:
rina-echo-time -l

client 3:
rina-echo-time -c 100
Round up
The above steps should give you a working rina connection to explore and play
around with. We will continue to post small tutorials as the project progresses
showing how RINA can be utilized in our existing software stack. So make sure to
check back.